Friday, June 29, 2012

What makes green curry green?

Haven't cooked as much this week, hence the lack of posts.  We decided to run errands Tuesday night and played volleyball Wednesday night so no cooking those nights.

Last night was my first attempt at Thai green curry and I must say it turned out wonderfully! It's pretty simple to make, just lots of simmer time.  The ingredients are as follow
Chicken
Green curry paste
Coconut milk
Fish sauce
Soy sauce
Thai chilis
Bell pepper
Onion
Potatoes
Green onions
Carrots
Broccoli
Brown Rice
Garlic
The veggies are just an option so you can add whatever veggies you want.  I cut everything up and put them into 2 bowls based on cook time.  I put the green onions, onion, garlic, and chicken in one bowl and the carrots, bell pepper, and broccoli in another. 
I started by par cooking the potatoes in chicken stock to get some extra flavor.  
So once those cooked for about 20 minutes, I cooked the thai chills in a stock pot with some olive oil to release the heat.  These are necessary but we like our heat so I added them for extra spice.  Depending on what curry paste you use and your tolerance to spice, you may not even need them so taste the paste first.  After about a couple of minutes, I added the coconut milk, fish sauce, soy sauce, and paste to the pot along with the potatoes.  At this point I started the rice, using water and some chicken stock from the potatoes.  After letting that cook for about 5 minutes, I added the bowl of peppers, broccoli, and carrots.  Once that cooked for a bit, I added the remaining bowl of ingredients and let it all simmer for about 30 minutes or so.  I let the mixture simmer for a total of about an hour from start to finish. 

Final product!
It was super delicious!! It had a great amount of heat, the potatoes soaked in all of the juices and spice.  I highly recommend this dish.  It's so easy to make and so good! 

Tuesday, June 26, 2012

Dinner in a dish

I never want to order chicken at restaurants b/c I feel like it can always be recreated at home and you always run the risk of chicken being overcooked and dry.  I decided to make chicken for dinner last night.  I decided to make an entire meal in one baking dish.  We ate a lot this weekend so I think we are going to try to keep things on the lighter side throughout the week, so I kept it simple to chicken and vegetables.  For dinner we had a brown sugar and garlic chicken with red potatoes, green beans, and mushrooms in a lemon sauce.  This was incredibly simple to make and the whole meal only cost me $20 and is completely organic and we probably have enough leftovers for 2 lunches each! The ingredients are as follows:
Chicken
Lemons
Olive Oil
Mushrooms
Green Beans
Brown Sugar
Garlic
Red Potatoes

I started by slicing 1 lemon, snapping the green beans, quartering the potatoes, and slicing the mushrooms.  Once all my veggies were cut, I put about 2 tablespoons of olive oil in my baking dish.  I used a 9X13 and my chicken just barely fit so adjust accordingly to your amount of ingredients.  I then placed the sliced lemons on the bottom of the dish. 
With my other lemon, I added about 5 tbsp olive oil and juiced the lemon into a bowl with salt and pepper and whisked it together.  I tossed the green beans in the mixture and pulled them out with tongs and placed them on top of the lemons. I did this again with the potatoes, mushrooms, and chicken. 

For the chicken, I also made a brown sugar rub.  I heated up about 1 tbsp of olive oil and added 5 cloves of minced garlic.  Once the garlic became fragrant, about 1 minute, I turned off the heat and added some brown sugar and mixed it together to the sugar was covered in olive oil.  
I used a spatula and spread this mixture on top of the chicken and put the dish in the oven at 400 degrees for 50 minutes. 
The chicken came out in 50 min and I placed it on a plate and put it in the microwave to retain heat.  I then put the veggies back into the oven for about another 15 minutes to continue roasting.  

I clearly forgot to rotate my pictures before uploading so sorry about the sideways-ness of everything! This dinner was great! I was worried the veggies would be too tart due to all the lemon but they weren't at all.  I think the addition of the brown sugar dripping down onto the veggies helped with that some.  The chicken came out perfectly juicy, not dry at all and cooked all the way through.  The skin was crispy and garlic and the meat had a subtle sweetness.  This meal was so easy to make and it all fit in one pan! I highly suggest this to someone who doesn't have a lot of prep time for dinner.  The majority of this dinner is spent in the oven. 


Saturday, June 23, 2012

Running short on time

I got lazy yesterday and just didn't get to blogging about Thursday's dinner so here it is.  After running errands with my mom, we realized it was getting close to 5:30 by the time we made it to Whole Foods. The plan was to make our own kebobs but since it was already late, we ended up just picking up some pre-made ones there.  We got 8 kebobs, 4 sesame teriyaki and 4 honey ginger.  Along with that, I decided to make a version of caprese salads since I'd been craving mozzarella lately and we always want shrimp cocktail so why not add that into the mix too.

I began with the caprese so it would have some time to marinate in the dressing of balsamic and olive oil.  I added some extra ingredients though, making it a little fuller than just a usual tomato, basil, and mozzarella.  The ingredients I used were:
cherry tomatoes
peppadews
mozzerella
artichoke hearts
balsamic vinegar
olive oil
salt
pepper
basil

I halved everything because I felt they would marinate better if the "meat" of everything was exposed.  So I started by halving the gazillion tomatoes, and then artichokes, mozzarella, and peppadews.  I chopped up the basil and then added the balsamic, olive oil, salt, and pepper to taste and tossed it all together.  Then I let it sit in the fridge for a couple of house, given it a toss every 30 minutes or so.
A couple hours later, I turned on the grill and started the kebobs.  I put these on about medium high and rotated them every 5 minutes.  The thing I hate about kebobs is that you have to cook them longer to allow the veggies to cook but then the meat is always a little overdone and maybe even chewy since the meat is cut up small.  I think next time we'll just make steaks and then make veggie kebobs.  Either way, these turned out well. 


After taking them off the grill, let them rest for about 10 minutes.  I put them in the microwave to sit b/c I was worried they would get cold so when we finally ate them, they still had some warmth to them.  

I threw together some cocktail sauce for the shrimp.  It was a simple process, just ketchup and some raw horseradish to taste and mix it all up.  We threw some lemons on the shrimp too. 
Final meal turned out a little like this
It was pretty good! plus, you can't really ever go wrong with shrimp cocktail or caprese with any ingredients as long as your ratio of balsamic to olive oil is good.  It ended up being way too much food for us to finish but made for nice leftovers. 

Thursday, June 21, 2012

First dining room dinner

My mom came in town yesterday and when I asked her what she wanted for dinner, she mentioned salmon.  Since it was on sale at Whole Foods monday, I bought 3 lbs of it...wild caught Alaskan king salmon.  Our friend, Trent, is going out of town today for the weekend and so I figured I'd have him and our friend Ryan, who's been out of town the last 2 weeks, over for dinner as well.  Our meal ended up consisting of grilled salmon, brussel sprouts, corn pudding, salad, ambrosia, brats, and grilled corn.

The day in cooking began a little like this:

I started by making a glaze for the salmon.  I did this early in the day so it could cool and thicken. I kind of just threw this one together with random ingredients I had around the house.  Luckily for me, it turned out well! The ingredients I used were:
green onions
garlic
serrano peppers
brown sugar
soy sauce
chicken stock
honey
brown mustards
I began by chopping up the peppers, onions, and garlic.  
I then heated up some olive oil in a small pot and cooked the peppers for a couple of minutes to release some heat.  I then added the onions and garlic and sautéed them until the garlic just started to brown. 
At that point, I added some chicken stock, about 1 1/2 cups, and the rest of the ingredients to taste.  I let this cook down for a bit until it came to a boil and thickened a little, whisking continuously.  It was still a little runny but I took it off the heat and poured it into a cup, covered it with foil and stuck it in the fridge.  

A few months ago, there were samples of this delicious "glaze" and cream cheese with crackers.  I bought a bottle that day because it was so good.  I decided to serve this as an appetizer.  It takes no time at all to make and is so good. All you need to make this are:
You simply pour the sauce over the cream cheese and cut it up to mix.  I put a little bit on each cracker and put them in a baking tray to serve.
I decided to grill the salmon on cedar planks.  You have to make sure to soak the planks in water for at least 2 hours.  I do this in a 9x13 baking pan.  I rotate them about every 30 minutes or so just to make sure they are all getting soaked completely.  
While waiting for the planks to soak, I started working on the corn and brussel sprouts since they take longer to cook.  I grilled the corn the same way as always, in foil with butter, salt, and pepper, turning about every 5 minutes.  

As for the brussel sprouts, I went the simple route and roasted them in a 9x13 baking pan lined with foil with some olive oil, salt, and pepper at 400 degrees for about an hour.  I tossed them at the 30 minute mark.  I put them in foil instead of directly in the pan simply for easy cleaning.  
Thirty minutes into cooking the sprouts and corn, I put the salmon and brats on the grill.  It was at this point that I glazed the salmon.  I also added a few rosemary sprigs to each piece for extra flavor.  
*side note* I love the smell of smoked cedar.  I remember the first time I used cedar planks and was constantly worried my grill would catch on fire because of all the smoke coming out but have since learned that that's a good thing! So if you ever use wood planks, don't be alarmed!  If you soaked them for a long enough period of time, they should be fine.  However, do keep a water bottle on hand just in case for small flare ups :) 

So 30 minutes later, all of my food was done and ready to come off the grill
I happened to have a platter from Thanksgiving last year so I felt it was suitable for the salmon.  Here are the finished products, including my dining table which was officially used for the first time  


Wednesday, June 20, 2012

A twist on the traditional

I'm not really sure what caused this craving but I really wanted to make meatloaf.  I thought about doing it Monday night even though Eric wasn't home yet but I'm glad I waited until last night b/c the meal ended up taking a lot more time than I thought.  Since we ate so many carbs the night before with Maggianos, I decided to make a "healthier" version of traditional meatloaf dinner.  I made a turkey meatloaf instead of beef.  I also added tons of chopped veggies. Instead of mashed potatoes, I decided on mashed cauliflower.  I also added a corn pudding to the mix.  There are lots of pictures for this dinner so happy looking!

I made the meatloaf mix well before I put it in the oven.  This was nice and easy b/c I was able to put everything together and then go to the gym.  I came back around 6:45 and preheated the oven and the meatloaf was already made.  All I had to do was shape it and stick it in the oven.  The ingredients I chose to use are as follows:
ground turkey breast
 ground turkey thigh
yellow mustard
dijon mustard
cayenne pepper
paprika
chili powder
worcestershire
breadcrumbs
egg
pepper
salt
chopped onion
chopped celery
minced garlic
chopped yellow pepper

The process began by sautéing the garlic and onions in some olive oil.

I let those cook for about 2 minutes and added the celery and peppers.

I didn't cook these until completion b/c I wanted them to retain some crunch in the meatloaf and I knew they were going to continue cooking for at least another hour in the oven.  You cook these before hand just so they release flavor for oven cooking.  Once I felt like they were cooked enough, I removed it from heat.  I put the ground turkey into a bowl and added my seasonings to taste as well as the veggies.
Give it all a good mix.  I use my hands b/c I love squishing things and making them by hand.  Plus, I feel like you get a better idea of how well everything is mixed if you can feel it.
A couple of hours later, I shaped the mix into a loaf shape and put it into the oven.  I don't use a loaf pan b/c it's a lot easier for clean up and I don't have to worry about whether or not it will come out cleanly from the pan after baking.  This way, I can just cut into it and when we're done with it, all I have to clean is the aluminum foil I can ball up and throw away.
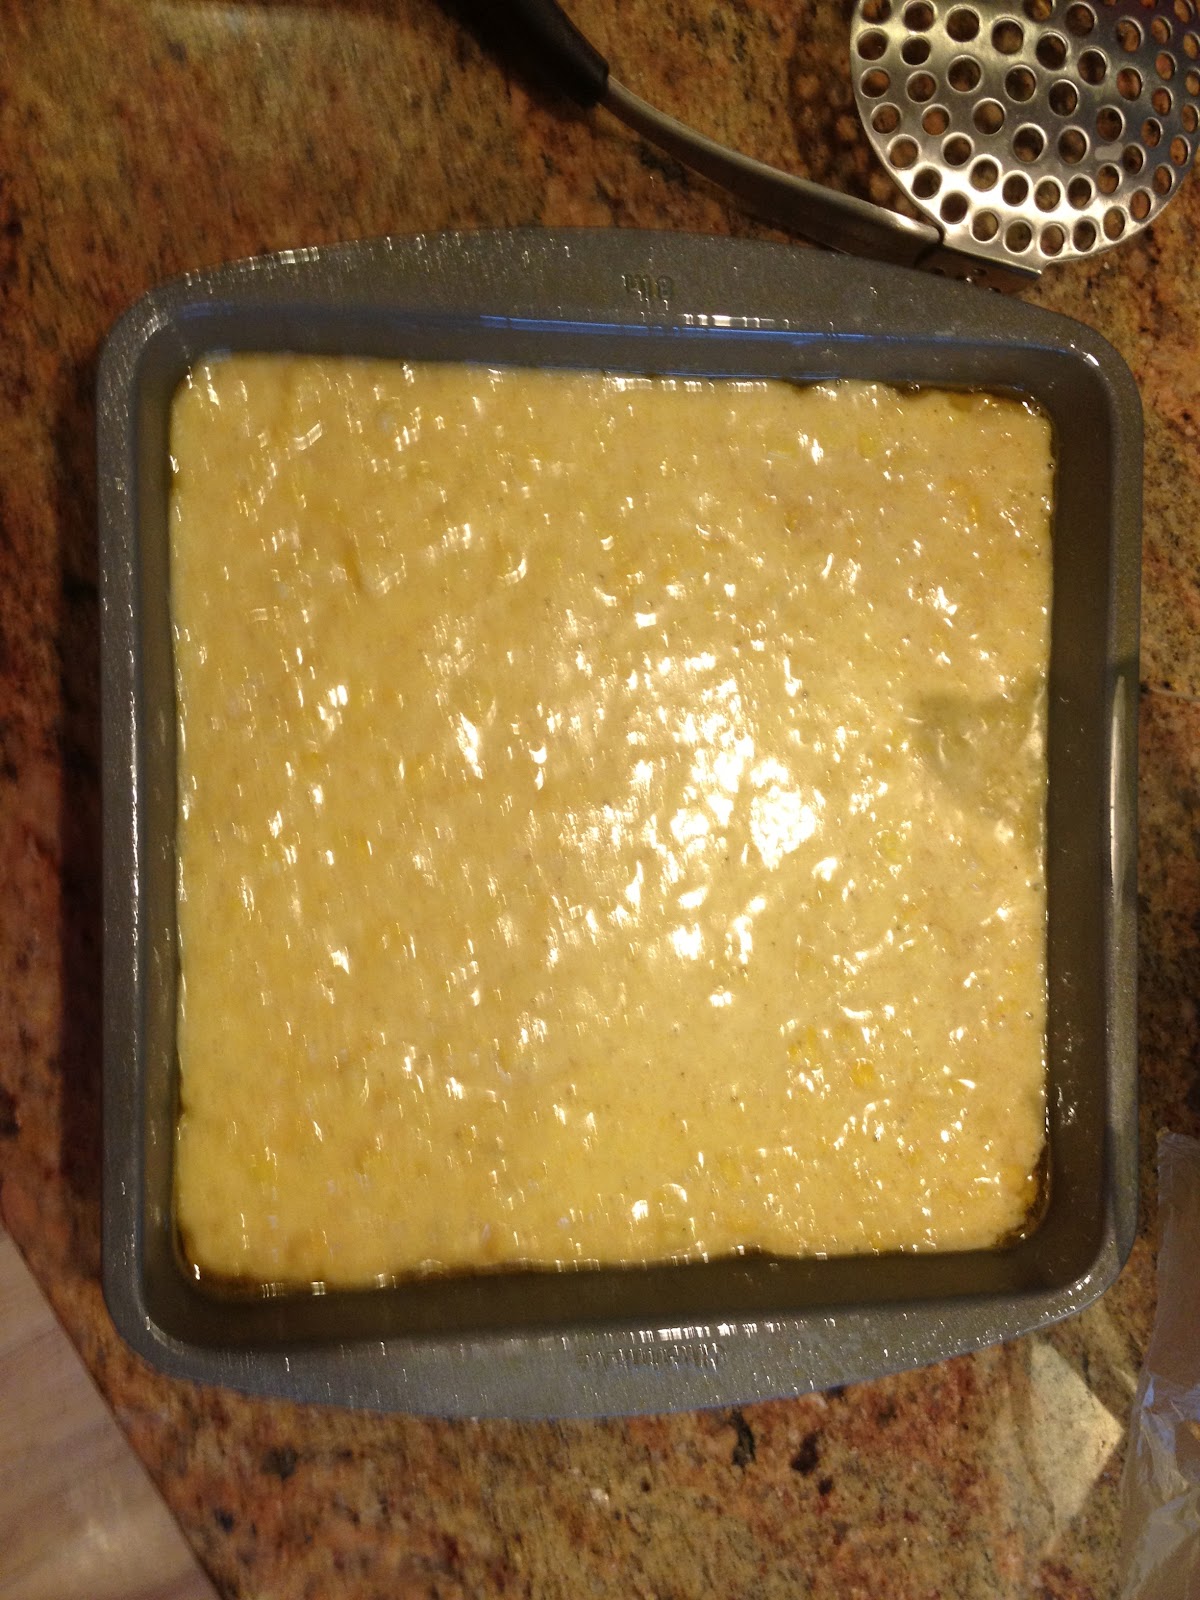
While the ovens were preheating (I had to use 2 b/c my baking sheet doesn't fit vertically so I couldn't put both corn pudding and meatloaf on the same rack), I put the corn pudding together.  It is incredibly basic and easy to make.  The ingredients that go into this dish are:
whole kernel corn
creamed corn
honey
cornmeal
eggs
butter
pan spray
sour cream
All you do, is take all the ingredients and put them into a bow and mix.  Once again, I did this with my hands b/c it is just one less utensil to deal with and it just always seems to work much better anyway.  Once the mixture is fully mixed, pour into a pre-greased pan.  I used 8x8 but you can probably use 9x9 or even make muffins out of them.  I put a little more cornmeal so make it more like a cornbread since I had planned on saving the majority for the next day's dinner.  I knew Eric and I wouldn't even come close to eating this whole pan.  With more cornmeal, I felt it would hold up  better as leftovers.  You can also choose to use less cornmeal to make more of a soufflé or pudding texture.  
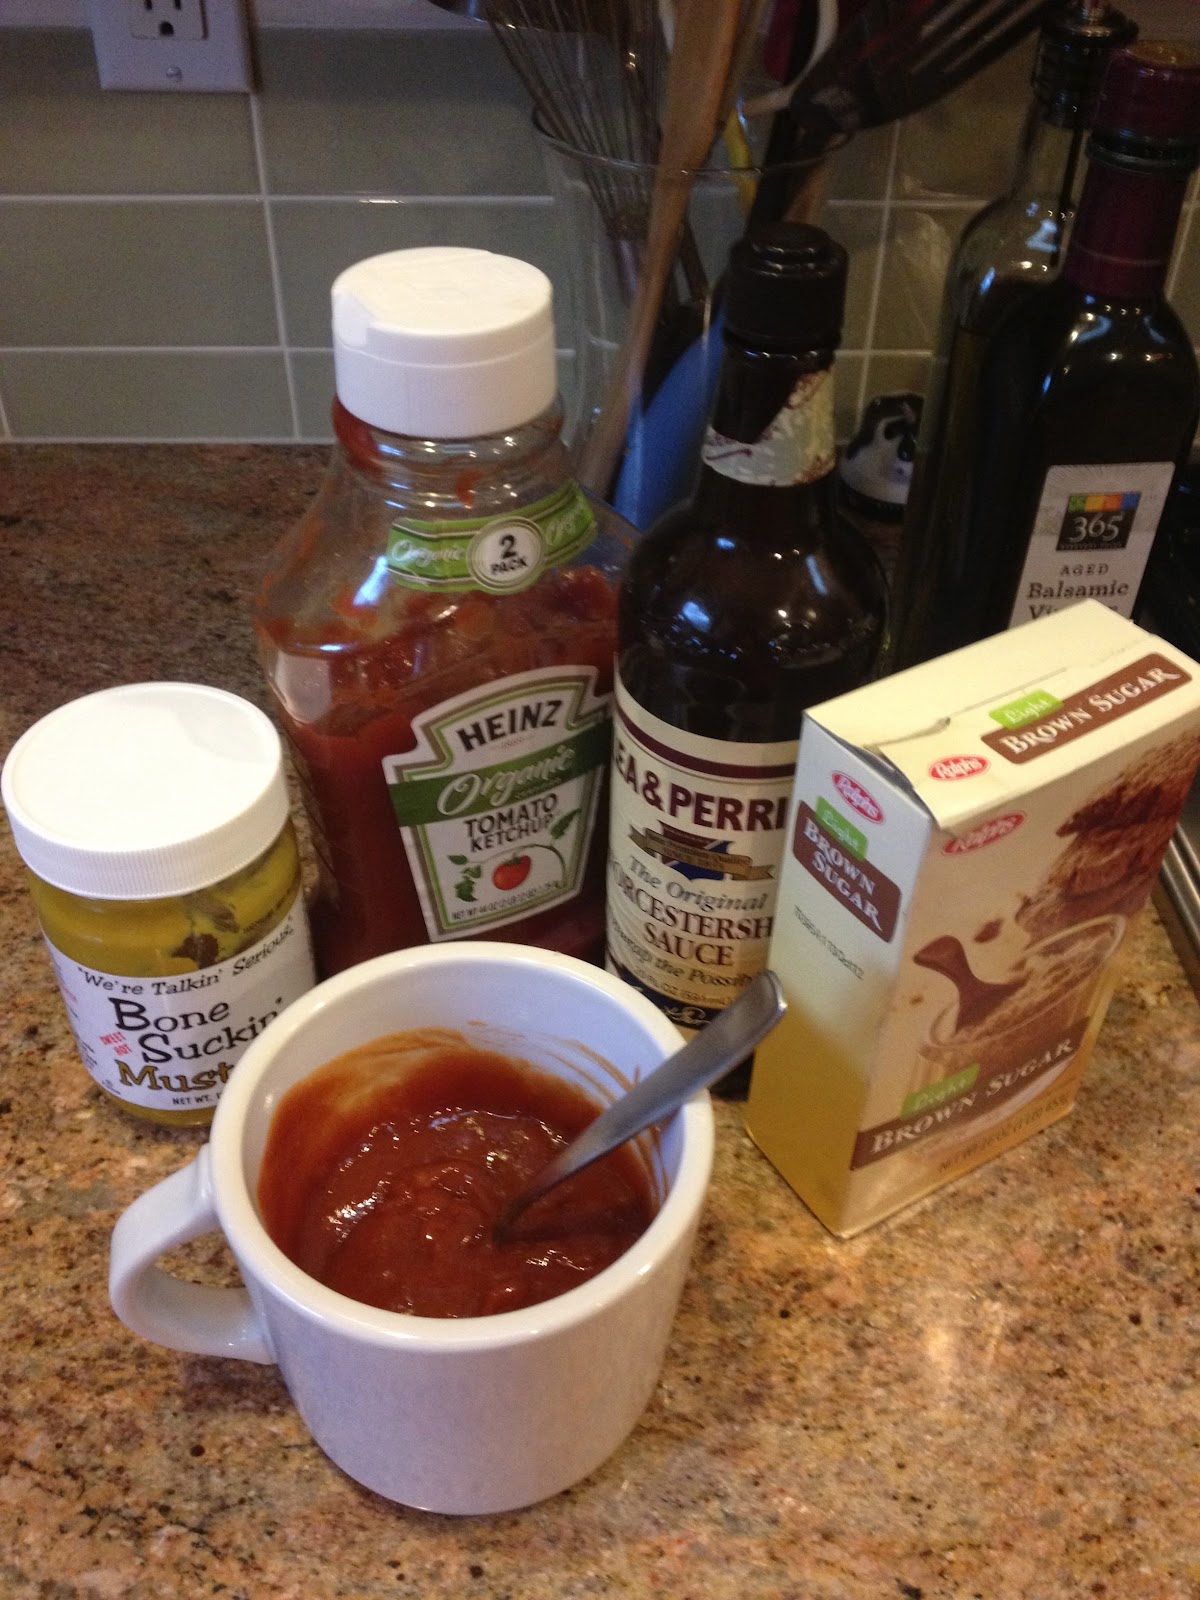
Once the ovens were preheated, both meatloaf and corn pudding went in.  10 minutes later, I took the meatloaf out of the oven and at this point, topped with a ketchup mixture.  I decided to use
ketchup
brown sugar
worcestershire
hot bone suckin mustard
I just lathered it on top and on all the sides of the meatloaf.  
I allowed both to cook for about an hour.  

With 30 minutes left on the meatloaf, I started the cauliflower.  The ingredients that went into it are:
cauliflower
butter
pepper
salt
spicy ranch
garlic powder
cheese
Eric decided he wanted spicy ranch so I substituted it for the half and half.  I used a whole head of cauliflower and broke it into florets. I started with boiling a pot of water and then put the cauliflower to boil for about 10 minutes. 
  Once it was soft, I drained the cauliflower and then dried it in between a lot of paper towels. 

I then added the ingredients and attempted to mash them together, using a potato masher.  

This didn't work so well so I had to use different methods known as the food processor.  This worked wonderfully!  I did it in batches to make sure there was a balance of spices in each batch and to make sure that it was chopped evenly.  I didn't want pureed cauliflower and lumps in one batch.  

An hour later, my corn pudding, meatloaf, and cauliflower were done.  
I'm not gonna lie, this was DELICIOUS! I was really excited about this meal b/c even though it was simple and easy to make, I was able to make this entire meal from memory and instinct.  I didn't need any recipes and I did everything by taste.  I'm glad that it turned out well though or else I may have been a little sad, especially since I've been making meatloaf for years.  This was a great meal and incredibly filling and not a lot of calories, which was the best part since we were both feeling puffy from the night before.